Monday, June 5, 2017

6A-3 Aquaponics


Finn.jpg


I got guidelines on how to build this system from inhabit.com.


My project was to address both overfishing and chemical farming.  My solution was aquaponics.  An aquaponics system is the most productive agricultural system per square meter, and that would solve both overfishing, as there would be enough fish, and it would not require chemicals or GMOs (genetically modified organisms).


I was inspired to do this project by a fish pond.  My grandparents have a fish pond in their backyard, with a 16 pound fish.  However, the pond got infested with algae and the fish died(actually, 2 fish died, but one of them was due to a careless sibling with a net).  I than got back home.  After that, I found out what was in fish food.  I learned that the fish are scooped out of the ocean with nets big enough to hold 12 airplanes, and ground up, along with whole chickens.  I thought this practice was wasteful, and very bad for the environment.  I then thought of a system that required no inputs, and that is how I came up with my first idea.


I had come up with the idea of an aquaponics system after I realised it would be very hard to make a self sustaining system for fish that required no inputs of oxygen or food.  Even then, I still ran into many challenges.  I did not have enough time to finish my whole project, and I did not have enough time.


If I had more time, I would first want to finish my project.  However, I think if I had finished my project, I would then think about ways to grow the plants in a more nutritious soil, so I can grow more energy giving plants without fertilizer.  I would also think about making the tank bigger(currently it can only support one fish).  I would also think about making the system completely self sustaining, with solar panels for the pump and aerator, and fish feed on the top.

From this project, I learned a lot about raising fish.  Although I was familiar with the concept of the aquaponics system, I learned a lot of important details on the system, such as having a 6 to 10 inch soil depth, and having 10 gallons of water per fish.


Many people were impressed by my project, not because of the project, but because they thought I put a lot of hard work into the project.  Everyone thought I did a good job, and they thought my idea was cool.


I think we should learn from this project that we are all we need to develop environmental solutions, and that we are able to make change.  I think we should also learn we will all need creativity and curiosity to help the environment.  We will need logic and core to help us, but without curiosity and creativity, we will get nowhere.  We should also learn we do not have to work alone and claim all the credit for something - an environmental solution will benefit all of us.

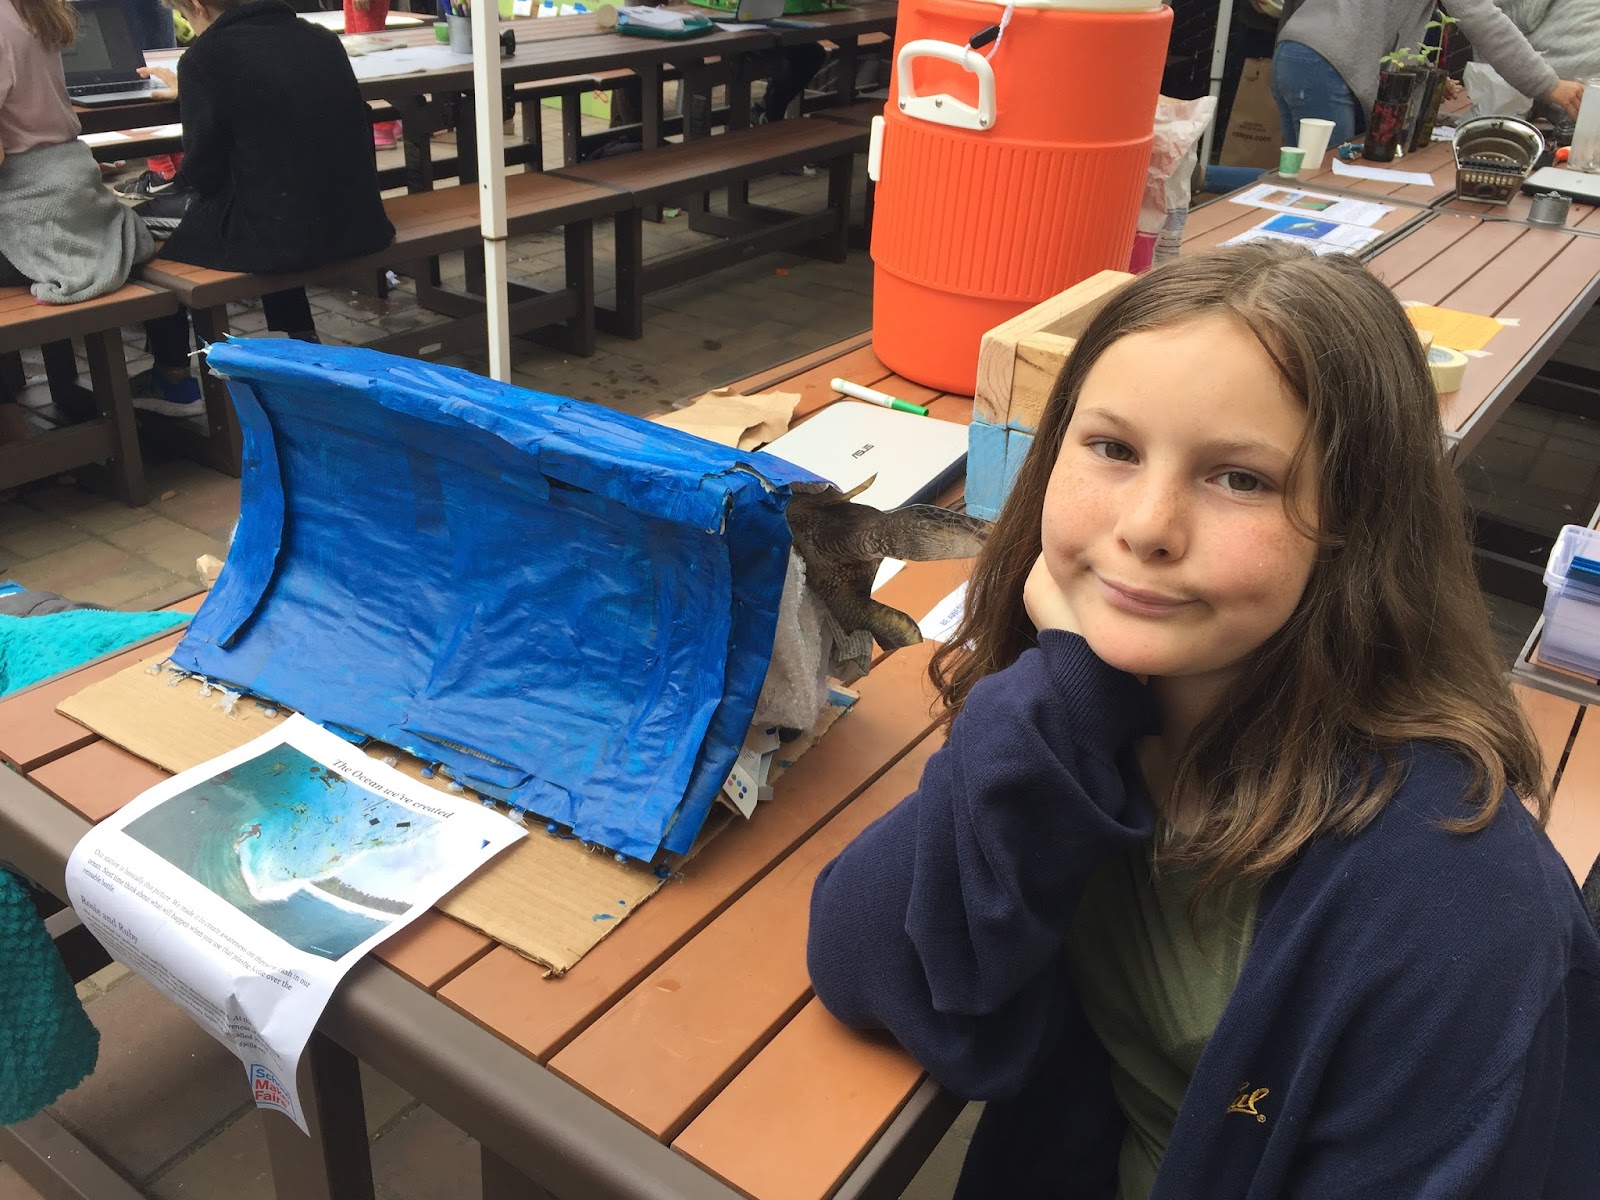
6B-6 Our Ocean Wave Of Trash

Ruby Sculpture.JPG
Our inspiration was really from when we went to the ocean cleanup. We were shocked at how much trash was washing up on the shore! We were also really upset that so many animals were being harmed from our trash. By making our wave, we hoped it would raise awareness in our community. The environmental problem we were addressing was the fact that we are polluting our ocean with tons of trash and it is hurting sea life. We want people to stop using so many non-reusable, plastic things! When we became partners, we actually both had the same idea of doing a trash filled wave! 

    Starting with chicken wire we built a very big wave and tried to paper-mache it. The paper mache did not work out...We decided that we needed to make a smaller wave, but still with the same idea. We stuffed our new wave with trash and it was done! When people saw our project, they wanted to know what exactly it was/what it was for of course. After we told them, they usually stayed for a second looking at the trash, and then went to get lemonade or sorbet… Both of us learned that you need to persevere, but if we had more time, we would definitely make a bigger wave to have a larger impact. From Maker Movement values, we can learn that YOU can help our environment, and you don’t need fancy machines or professionals.

- Ruby and Rosie

7A-5 Branch Light Fixture

        For our maker project we chose to make a light fixture out of branches. Our inspirations were modern lights and nature. We both really liked the idea of incorporating light to art and nature. This project will hopefully be enjoyed by anyone who can appreciate the mysticality of nature and lights. Our prototype was based off of modern lights pictures on pinterest. 

A lot of the time, we just think of lights as . . well . . . lights! But turning light into an art form is taking it to the next level, and a visually pleasing level might I add. Our project had a 100 dollar budget, which didn't present much of a problem to us. The constraint that presented a bigger problem was time. Although we had quite a bit of time to work on the project, we had wasted A LOT of time using wood glue instead of hot glue. We realized after using wood glue to attach several branches to the platform we had created, that the glue would take too long to dry and we couldn't hold the branches in place forever. We switched to using a hot glue gun to attach the branches to the platform, and that proved to be much quicker. 


Although the hot glue worked to put the branches we used onto the platform, we recommend if the branches you are using are fairly heavy, that you use wood glue. Luckily, the branches we used were very lightweight so we could use hot glue. 

In the process of creating our branch lamp, we learned quite a few useful things. The most important thing we learned was how to use a jigsaw. Without the jigsaw, our circular platform would have been a lot harder to cut! 

Sunday, June 4, 2017

7C-2 Eternal Terrarium


 Eternal Terrariums 

    Over the course of a week I created two sustainable biomes. I was inspired by a video of a man who created large and small terrariums with a range of plants and insects inside. I wanted to create the terrariums so that I could observe the way the plants and insects behave without human interaction. 

    Of course this whole process was carried out at school so there were a few constraints, like time, cost, and storage space. But since I did a fairly small, simple, and inexpensive project, none of these were a problem. 

Like I said my project was inexpensive a six pack of half gallon mason jars would be about $20 and all of the things inside the mason jar were free. The only piece that could possibly cost you something would be the gravel or sand at the bottom of the jar. 

   I made the terrarium by first cleaning out the jar with water, then placing four dots of hot glue it won't scratch or roll on your table (you can place the glue so that the jar rests vertically or horizontally). Next you fill about an inch of sand or gravel in the bottom of the jar for drainage. Than I put soil from our school garden over top of the stones. Once the soil was set I sprinkled it with some water and then collect plants (I recommend succulents and or cactuses because they are hearty and can adapt to changing environments well). If you want your plants to root better you should collect them then place them in a water tight container with some water in it. So they are partially submerged in the water. Then leave the submerged plants for 24 hours. Once the plants have begun to sprout roots go ahead and begin to arrange the plants to your liking. You may also add bugs if you would like. Just keep in mind the terrarium will replicate a rainforest like environment so the bugs must be able to survive in that kind of climate. I would advise that you use less water in the beginning then add more at the end of your process. I found that as I added water throughout the process it began to flood the terrarium. 

    It can be hard placing the plants how you like or how you think they should be with just your hands. I was really struggling to place the plants but then I realized I could use tweezers to place the plants in an apeeling and successful way. Throughout the process of creating these biomes I have learned that if something is not working and there is nothing you can do about it it will fix itself (at least as far as plants go). My only wish is that I had more time to create more terrariums in more innovative containers. 

   I added a 3D printed mushroom in each of my terrariums to add a pop of color and just make them a little more magical. You can also add any small plastic toy or figurine you like. I find it makes each one unique the way the plants and insects reclaim the man made object can be fascinating.

7C-7 Duct Tape Hammock


The duct tape hammock. A colored lattice of adhesive taping for the objective of relaxative use. Yes; it worked. And no; not that kind of laxative. Our hammock was inspired and based off of the article by Lance Akiyama from Make. It’s designed with crystalline-diamond and rainbow duct tape hues, double-reinforced with uv-resistant gorilla tape, and  when tethered by suitable counterweights, our hammock can hold over 150 pounds.


Photo by Sam Hill


We faced many challenges throughout the making process. We toiled with the challenge of unsticking already folded duct tape, we found a solution in cutting out the ruined, folded tape. However, this solution changed the coloring scheme of the duct tape because we did not have enough colored tape. You can see this in the photo above. Another challenge was creating our hammock under the constraints we were given; limited resources and limited time. And you might be thinking; why meddle in the tedious process of making a 40$ hammock yourself when you might easily buy one? For the pride of making.


 And what have we learned from all this? We learned how it is nearly impossible to unstick two pieces of duct tape adhesive. We also learned the valuable process of deductive reasoning. The next step to do is to make it again, on a larger scale. Create a duct tape hammock that can hang from giant redwood trees 50 feet above the ground. If you are energetic enough to try out this project, then make sure you have backup materials, and to be very cautious. One mishap can lead to hours of tedious extra work. And always remember-if you can buy something; don’t buy it. Make it.

7B-7 Photoshop Stories

For the school maker fair, my project was a slideshow of pictures that I created using Photoshop. I wanted to make this because I am really interested in photography, and Photoshop is a very important editing tool. I was inspired by the movie The Secret World of Arrietty, which is an animated movie about a miniature girl who explores the big world (Watch the trailer here!). I re-created this using photoshop by taking pictures of my friend and adding them into backgrounds. I then made her look smaller by scaling down the cutout of her to create my final image.


I really enjoyed learning how to use photoshop, even though there were definitely some bumps along the way. One of my biggest challenges was learning how to cut an image out of one background and move it to another. However, it turns out all I needed to do was turn off background lock.


If I had more time to complete this project, I definitely would have turned this into an actual book that you can pick up and hold. For the version of this project that I did, the cost was $9.99 for the Photoshop tool. Learning how to use Photoshop took a  VERY long time,  but I would recommend it for people who like photography!


7C-9 Desktop Destruction- turn your favorite lunchtime fruit into a deadly weapon!

For our Maker Faire project, Zoe and I decided to make mini launchers out of office and school supplies such as pencils, pens, binder clips, and rubber bands. We chose this project for a number of reasons. First, the idea of flinging things like blueberries and grapes was appealing, because Zoe and I both like launching things. Also, we had the idea for a "blueberry cannon" for a while after some blueberries started mysteriously rocketing over the fence. Another reason we liked this project was that at our booth, people could come and shoot things, (there would be a hands-on, interactive approach). Our objective in this project was to create cool catapults that actually launched pretty far, in order to make boring old school supplies more fun. We made the CD Catapult, the Viking Catapult, the Clothespin Chaos Catapult, the Binder clip Blaster, and clothespin darts. Some criteria were safety, we didn't want anyone to get hit in the eye, function, we wanted it to actually shoot, and we needed it to launch pretty far. Some constraints were our lack of skill with pliers, we found out, finding the necessary supplies, and being able to finish it in the time constraints.

For anyone who is confused (I just kind of rocketed into an explanation, as always), Zoe and I read up on catapults prior to the project and learned some things about them. The main parts of a catapult are the main block, or the frame, that holds it together, the arm, which you pull back, something on the end of the arm to hold whatever you're pulling back, a base, a clamp, and a lever that has the rubber band attached to it. The rubber band (or whatever you're stretching back) can also be connected to the arm, to create and release tension. On this site, you can find some fun catapult projects to do at home. 

Our design process was based off of some designs from a book called Mini Weapons of Mass Destruction. We improved a lot on their designs and changed some steps and materials according to what we had available and what we thought would function better. First, we drew out our designs, and then collected materials for whatever catapult we were making. Next, we put together the launcher, occasionally referring to the book but adding in many steps as we went. Penultimately, we went outside and tried launching them with first a blue pom-pom so no one got hurt, and then with blueberries and marbles. Last, if they didn't shoot, or didn't go very far, we tried out new methods to shoot them, replaced rubber bands, or tinkered with them a bit (in some cases a lot). Some fun parts of our project were "testing out" the launchers, and watching our classmates as they tried to launch them.

Even though Commander Momitchi and Commander Hiro (me and Zoe) came out with a very successful project at the Maker Faire, there are still things we could add on to our army. Some next steps would be finishing our trebuchet, which we started and never finished. In case you're wondering, it uses a battery as a counter-weight, which swings into an eraser that flies off (basically, too complicated for the 50 minutes we had left). We could also add wheels to our catapults so that they would move freely, or put them on stilts so they were taller. We could also have made more weapons, and an idea we had was spray-painting them all silver so they looked uniform (although then you wouldn't be able to see what they were made of and we think that is cool). Another idea could be completely cutting ourselves off from our very inspirational book after a few projects and designing a catapult all on our own, which we would do if we had more time.

For anyone looking to replicate our project, make sure to use a ruler when creating anything that needs to be even, as that was a problem, and make sure to be careful with X-acto knives. We recommend Mini Weapons of Mass Destruction as a starting point, but don't take everything they say for granted. A lot of times, when the author says use rubber bands, it's better to use duct tape even though that isn't technically an office supply. Try shooting the catapults at least ten times in different ways, (i.e. rubber band in a different position, different height, two rubber bands instead of one...), before you make your final decision as you might discover something you've overlooked. Another important tip: don't make anything permanent! We had to do many last minute fixes, and on one catapult, we had to take it apart many times because the arm, a spoon, was turned the wrong way, then the rubber band was on the wrong side, so we changed the spoon back, but we shouldn't have, and so on. Don't be afraid to play with your "finished product", because for us, they're never finished.

We learned a lot through this process. We developed better teamwork skills, and learned that we focus very well together and don't distract each other. We learned a lot about building with duct tape and school supplies, including the strengths and limits of each material. For example, Popsicle sticks break when you bend them over and over, and in some cases, it's better to use duct tape than to lash things together with a rubber band like it says in the book. Also, it's very hard to get a small binder clip sideways onto a popsicle stick, don't try it. We learned that we could condense steps from the book and throw out ones that we didn't need, like the binder clip/popsicle stick step I mentioned before.

One frustrating glitch in our project came when we were making the "Original Blueberry Launcher" catapult out of a CD spindle casing. We had to make holes for pencils to go in through the plastic on either side of the cylinder. We had to reinforce the brittle plastic with duct tape so it wouldn't snap- but that was where the problem started. We tried an X-acto knife, a box cutter, and scissors, which all failed to cut out a hole. By poking and twisting at it with a screw, we managed to make a small hole which barely came through. The next day, we had the brilliant idea to drill it, but Ms. Mytko was at a 3D printing convention and we didn't know where the drills were, despite looking in the drawer labeled "Tools". Finally, we had the bright idea to use a hot glue gun to melt holes (which may or may not be toxic). Our best method after trial and error, was making a small dent with hot glue, poking it through with a screw, widening it with a pencil, then more hot glue, and finally more widening with a pencil until we got the right shape.

Overall, our Maker Faire project, blueberry launchers, was fun, successful, and taught us a lot about structural design of weapons.

Zoe (right), with the hat, and me, Lexi (left), with the braid, explaining our project to excited (we hope) viewers.

7B-10 Foam Glider Fails for Life

For the BPC school maker faire, I Julian B plunged in to the challenge of flying a glider. I knew it would be hard but I tried and failed. My foam glider's wing span was 50 inches wide and 12 inches long. I chose this project because I had previously watched a few really cool gliders fly super far. (They only put the ones that work online:). I was tempted to make my own fly as fare as their's. It didn't go so well for me. I used lots of tape, foam, card board and time. I also used 2 blades on an exacto knife and a tape-measure to make my fail of a foam glider.
As you can see I used multiple diagrames to create my final glider. I think that without the cardboard it would have been lighter allowing for a longer flight . Mine only flew 18 feet of of the balcony of a 2 story building. Even thought I failed, I had a ton of fun making, flying and finally destroying the glider.
By Julian B 7B

7A-10 PVC RE-Curve Bow


            My Maker Project was to create a PVC re-curve bow. I chose this project because I love archery and making bow and arrows. I was inspired by one of my summer camps last year, Make a Bow by Trackers. We spent a week in the wood shop, sanding down and cutting wood for our bows. While I was gluing down the backing for my bow, I saw a pile of strangely bent PVC's lying in the corner. They were homemade PVC re-curve bows, melted down, flattened and bent. Ever since that day, I have thought of PVC very differently, and was inspired to try and recreate it for my Maker Project. Here are the steps I used (or would of used) to create the bow:

  1.  Cut the PVC to 5 ft
  2.  Mark:
    1. The center of the PVC
    2. 3 in from the center on either side (the handle)
  3. Find a piece of wood (around 1-2 in in height, 2.5 in long, and 4 in wide)
  4. Drill/hammer two screws/nails into the wood, each sticking exactly 1 in out, and placed 3/4 in from the edge on both sides.
  5. Heat (using a heat gun) thoroughly from the edge of the handle to the end of the bow.
  6. Once satisfactory, position the finished wood over the PVC, the nails/screws aligned with the edge of the handle.
  7. Push down hard on the wood until the PVC tapers into a flat end. 
  8. REPEAT ON OTHER SIDE
  9. Reheat from handle to end, and bend over large cylindrical object (depends on how much curve you want)
  10. REPEAT ON OTHER SIDE
  11. Heat handle, and squeeze to fit your hand with a glove.
  12.  Sand/saw the ends to a triangular point
  13. REPEAT ON OTHER SIDE
  14. Cut diagonal notches on the ends, pointing toward the center of the bow
  15. REPEAT ON OTHER SIDE
  16. Take bow string and string bow.
           One challenge I never overcame was time. I never finished my project in time because my math teacher recruited me to help him prepare for the ERB tests. I still learned valuable things though like dealing with time management, using a heat gun, and more about the physics of PVC. I engaged in the design process by empathizing with the user. The handle was originally designed to be customized to the person it used. You would heat up the handle and the mold it to your hand shape using a heat resistant glove. If I had more time, I would have finished flattening out both edges, curving them, and attaching the string. My advice to people doing this project, is do it safely and thoroughly, you want the bow to reach its full potential! Watch the tutorial I used here! Thanks!

7C-5 Chicas Skateboards

For our project we decided to make a skateboard. Two of our group members have wanted to make a skateboard for a while, and this felt like the perfect time. The objective of our project was to design an original skateboard, that would function. Our group faced several problems regarding not being precise. One example is when we estimated by eye where to drill a hole for the trucks. We were only a little bit off, but that one hole was too far out for the trucks. Our solution came when we found that the trucks had two holes for screws. We redid the drilling with measurements and it worked. Our group also used a lot of prototypes. We used one to cut our board out. We cut out a piece of cardboard in the shape that we wanted our board to be. Then, we laid it on the piece of wood that we would cut our skateboard out of, and we used it as a model. It helped a lot because we had something to try our ideas on and a line to cut on.

During the process of building the skateboard, our group learned to always measure and be precise. We also learned that spray painting designs, drilling holes, making models, or even just finding the right materials are not easy things. If our group had had more time on the maker fair project, we would have liked to build the trucks and wheels as well. We would have also liked to have made trick board rather than a long board. If anybody decides to design their own board, I would advise not riding it down a steep hill and again, being very precise. Here is a video of reference: https://www.youtube.com/watch?v=UNwkDkowKpg. (The video is for a way more real deal skateboard and it’s pretty complicated, but it’s still helpful.) The estimated cost of our project if you had to buy everything, would be about $45. However, since we only had to buy trucks, bearings, and spray paint, it only cost us about $25.

7A-9 A Bamboo Bow and Arrow

Displaying IMG_0274.JPG
Our project was a bamboo crossbow, but that proved too hard in the time given. Our first idea was to  buy a piece of bamboo on Amazon, and try to bend it to make the bow. But then we quickly realized that dried bamboo is nearly impossible to bend. So we got a fresh piece of bamboo. The fresh bamboo was a lot thinner than the dried piece of bamboo, but it was still usable, and bendable.  The way we thought we could bend the dried bamboo was by soaking it in water for a day, but then, we realized that that only worked for fresh bamboo. So we made a mold for the fresh bamboo and put it in for about a day.

As it was bending, we made the string for the bow out of artificial sinew by twisting it over itself. After we took the bamboo out, it was bent and ready to string.

To string it we drilled holes on the ends of the bamboo and then we zip tied the extra piece of artificial sinew through the hole to the piece of bamboo, which surprisingly, held pretty well.

In the process of making the bow out of fresh bamboo we wanted to see if we could use the dried bamboo at all, so we took one of the extra pieces that had not been cut and just tried bending it by using a bench, which as expected, started cracking. We thought at this point that nothing could be done with the cracked piece of bamboo, except a little afterwards we realized that now that the bamboo was cracked in the middle, it was more flexible and able to bend a little bit. After discovering this we decided to make a second bow using the same artificial sinew for the first bow. The second bow did not work nearly as well as our first, but we didn't have very high expectations because it was just an experiment.

Despite not being able to make a crossbow, there were many other things to take away from this experience.  For example, we learned that dried bamboo was very hard to bend and maybe we could have done a little bit more research and planning before we started this project.

-Duncan and Niles

7A-4 Cardboard Tank


For Maker Faire we built a cardboard and wood tank. We wanted to build this because we have been building with cardboard and all year and we decided we wanted to build a giant creation.

  
One way we went through the design process was that we at first wanted to build the entire tank out of wood, but then we realized that would be too expensive. So we decided that we were going to build it with a wooden skeleton but we found that was also too expensive. So we decided on the idea we used which was to have a wooden base and have a cardboard and PVC frame. One challenge we had was putting on the casters because we realized the bolts we had were too small so we had to find longer bolts which we found, but then when we put them through the wood and put on the casters, we realized the casters would hit the bolts. To solve the problem we put nuts on top of the wood and then the casters did not hit the bolts anymore. One thing we learned was that zip ties hold cardboard together a lot better than screws and nails do.

Next time if we built it again we would make it look nicer and maybe decorate the inside. We would also have liked to find a better way to propel it and put some sort of turret or catapult on the top. Some advice we have is to put the casters on the bottom before you put on the cardboard and PVC frame.  Another piece of advice is to get large pieces of cardboard that are large enough to cover an entire side because it will be a lot easier to put the tank together and will require a lot less zip ties. 

The total cost of building the tank is a decent sum. It is 11.76 for 4 8ft 2 by 4s. It is 15$ for a 4’ by 8’ by 7/16’’ piece of plywood. It is 13.7 for 8 plate swivel casters although 6 will work. It is 9.94$ for 650 zip ties, you don’t need that many but it can be nice to have a lot of extras. It is 13.89 for the 3, 1 inch by 10 ft PVC pipes. The bolts for the casters will vary in cost because you need the bolts to fit the holes on your plated casters and go through the wood, the cost will probably around  15$ depending on the bolts and casters. The cardboard you can get for free some tips on where you can get it is on this website. You also need a drill, box cutter, a saw, and some screws. The total is probably going to be about 80$. This is a link to some other ways to make a cheaper cardboard creation.

-By Nik and Gabe 

7A-8 Using the Bridge (AR/VR/MR) Headset

For my Maker Project I worked with the Bridge. The Bridge is a AR machine that allows you to scan an area and use it as the background for VR.

You can play with a robot named Bridget in it. You can play fetch, open portals, and make furniture appear.  The bridge is very interactive and has a lot of potential.

The reason I chose this project is that I really wanted to experiment with the Bridge and find it potential.  So during science class I kept experimenting with it trying to scan places and get a good experience.  I kept ending up with bad, ugly scans of the places because whenever someone walks through my scanning area it messes it up. I tried to deal with what I had, but whenever I looked away from what I scanned it would lag out.  Also you could move the not scanned black stuff because it glitches.  It was a very bad experience - just boring all around. [Teacher Note: We have a lot to learn, so we are not necessarily blaming the equipment yet!]

We have contacted Occipital (the people who make bridge) asking them tips on how to get some good scans. Overall I really enjoyed messing around with the bridge and I can't wait until we got some good scans!

7B-6 3D Printed Gear Fidgets

For our maker project, we wanted to create something that kids everywhere would be interested in using, and we also brainstormed different ways to spread our creations beyond the school to reach a wider audience.  We wanted to use our knowledge of 3D printing.  As we saw the rise of fidget products all over our school and all over the country, we realized that we had found our project: we decided to 3D print some fidget spinners that we designed ourselves out of recyclable filament.  There were some technical challenges that we experienced: for instance, the design we created ended up with some overhangs, which you can see in the image above.  To deal with this, we decided to use dissolvable support material to hold them up. We also had to make a decision about what printer to use of the ones available to us at school.  We chose to use our old Makerbot Replicator because of its dual extrusion capabilities, and this served us pretty well.

At first we were just making very colorful objects with two different colors of filament. We made this two color frog, along with some other things. After making a few multi-color prints, we quickly realized that this printer wasn't made just for printing with different colors. There must be some other reason that they made a dual extrusion printer. After doing some research, we found out about dissolvable filament. With dissolvable filament we would be able to make very complicated prints and dissolve the support material in limonene. One of the biggest problems with 3D printing is that you can't get support material out of very small places. With dissolvable filament, it was also possible to make moving parts in one print. Our first test was to make this gear thingy. We then decided we wanted to make more, and designed a different two geared fidget. However, we had a problem, the sides were not fully connected and the model often broke. We redesigned it, and it look something like this:

2.0 coming out of a tub of water after getting soaked in Lemonine

We used Tinkercad because of its very straightforward design software that all of our group members knew how to use and the fact that we could use geometric shapes very easily along with the community shape generators. 

To get started with our project, we started out with a simple dual geared fidget because we had no experience making this type of project before. Starting simple was helpful, and we later were able to get more complicated and make things like triple gears and quad gears. 

One of our greatest challenges was when one part of the 3D printer we were using broke. We were able to re-3D print this part but it was a bit of a hold up. We also had to come up with a way to fix the windows for our 3D printer because our print’s kept peeling and we needed to stop drafts from reaching the heated build plate.

Elan fixing The Replicator

Throughout this process we learned not to rely on machines because machine failure is common. We also learned that even if you are using a very baseline software, you can still make amazing creations with it, it just may require more work.

If we wanted to continue this project, we could create more gear designs using ball bearings. This would be hard though because we might have to not print the gears as one piece so we could insert them, or we would have to put them in mid print. 

Our advice for other people who do this project is to start early and use a web based software (like tinkercad.com) so that they will be able to access and change their project from different places.

An estimated cost of materials in this project (not including the 3D printer) is about $40 because of the fact that the slicer and the design program (Tinkercad) were both free, so the only costs we had to cover were filament (ABS and HIPS) and electricity. This $40 could cover many, many gears, because they are almost hollow and therefore very efficient with the material.

Rolls of ABS and HIPS

To learn more about dissolvable filament check out this on MakerBot’s website.

One day while we were waiting for a set of gears to print we chose to make a website at www.thegearmakers.wixsite.com/gearmakers. Through our project we had to fix the Replicator about six times and replace some parts. By the end we had created four production lines. And already finished two of them (dual geared basic and dual geared +). We thought that with four different products to choose from we had finally done what we had meant to the whole time, we had finished with our fidget production.

7C-6 Building a Rube Goldberg Machine

Maker Faire Project: Rube Goldberg Machine
By: Luke, Diego, and Jackson

Have you ever wanted your life to be more complicated? Have you ever wanted to take the long way around? Well read on to find out how a group of students from the school Black Pine Circle accomplished this by making their very own Rube Goldberg Machine!


First of all, in the words of a wonderful website called Wikipedia, “A Rube Goldberg machine is a deliberately complex contraption in which a series of devices that perform simple tasks are linked together to produce a domino effect in which activating one device triggers the next device in the sequence.” In simpler words, it is just a (usually) huge, awesome, series of chain reactions!


We  built our machine to try to make slicing a piece of bread as complex as possible. Sadly, due to time constraints and safety reasons, we decided it would probably be more simple to just make a Rube Goldberg Machine with no set ending, just adding on to it as much as we can. This provided multiple benefits. First of all, since we only had about a week to make our machine, we could just work on it as much as we could, and end it where ever we needed to. Second of all, we realized that making a complex machine out of cardboard and duct tape to slice a piece of bread is much more challenging than we had previously thought.


We really only had two constraints. One of them was time, which we foresaw, and accounted for, but the second, which was the weather, we didn’t. On the day of the Maker Faire, the sky was gray, and looked like a water balloon about to burst. Luckily, the sky was a very thick water balloon, and not a drop escaped. But the weather on the other hand, resembled a wind tunnel. This was not very good setting for a project which included multiple parts that were precariously balanced. Time after time, we would set up our machine, and time after time, the wind would blow it down. And sadly, the few times the whole machine did get set up, one little step would malfunction, and the magnificent chain reaction would grind to a painful halt. After much struggle, we decided we would set up a folding table set on it’s side, as a wind blocker. With five minutes left of the Maker Faire, none of us were feeling very optimistic. We decided to throw all doubts to the wind, and give it one last try. Surprisingly, to all of our delighted amazement, it worked!


Our brainstorming process was much less exciting, as is to be expected. But just for you, I will make it as exciting as possible. Our group started by all coming up with ten ideas we would want to do for our Maker Faire project. After much intellectual conversing, the original thirty ideas were whittled down to a three. The final three ideas trembled with anticipation, hoping with all their hearts to be chosen. After even more intellectual conversation, and some compromise, one lucky idea was chosen.


After the decision was made, we started prototyping our idea. We decided to make every piece as independent and simple as possible for easy transportation and setup. We then built the first step of our project. We used many top of the line materials, including hot glue, used pinboard, duct tape, used P. V. C. pipes and cardboard. After assembling the first part of our project, one surprising problem we had was storing it in a place where it wouldn’t be broken. We first stored it propped up against a table in a back room where we thought there wouldn’t be much foot traffic. We were wrong. Upon returning to the creation of our project, we realized that over the span of one day, one of our P. V. C. pipes and one of our rulers had been knocked off of our project! From then on we decided to store our project on the top of a shelf.

Our theoretical next step would be to make a new machine with more planning and time. We would also come up with more ideas and could potentially use school restricted materials like sharp edges and fire.


If you want to make your own Rube Goldberg Machine, you can't really mess up. But planning it out before can be very helpful. For us, watching videos of Rube Goldberg Machines other people had made was very valuable as it gave us many ideas for the creation of our own.

Overall, creating our Rube Goldberg Machine, and the process of creating it offered a great learning experience for our group. We learned many things including: sometimes making a specific end goal of your project can be better because it generates more motivation to work on the project, finding time out of school to work on your project can be very challenging, looking at every last detail of your project and setup of your project can be very helpful; it might let you foresee preventable problems like the weather, storing your project on top of a shelf can be very beneficial to the well being of your project, and finally, having your life less complex, and taking the short way around things can make your life much more enjoyable, unless you are making a Rube Goldberg Machine.

Our machine cost approximately $6.33. All we had to buy was 1' ball bearings, because a marble wasn't heavy enough to knock over a piece of wood.

You can see our project running successfully right here:

Here is some background information on Rube Goldberg Machines

This is a picture of our group looking dejected after a failed attempt.